

The 3 AM Problem Nobody Warns You About
It’s 3 AM. Your dog needs to go. You’re on the 14th floor.

The elevator takes forever, the lobby is cold, and by the time you get back upstairs, you’re wide awake and resentful.
So you decide to build an indoor or balcony potty spot.
Here’s the thing:
Within a week, that potty spot becomes a smell you can’t escape.

Not a mild odor — a full-on ammonia wall that hits you every time you walk past.
Sound familiar?
If you’ve tried a basic mat or a grass patch with no drainage, you already know the problem.
What you might not know is why it happens — and why most DIY potty builds fail in the same way.
Let’s fix that.
Start here with our Apartment Potty Protocol guide. For the complete potty training framework.
Why Stationary Urine Becomes Ammonia (The Science You Need)
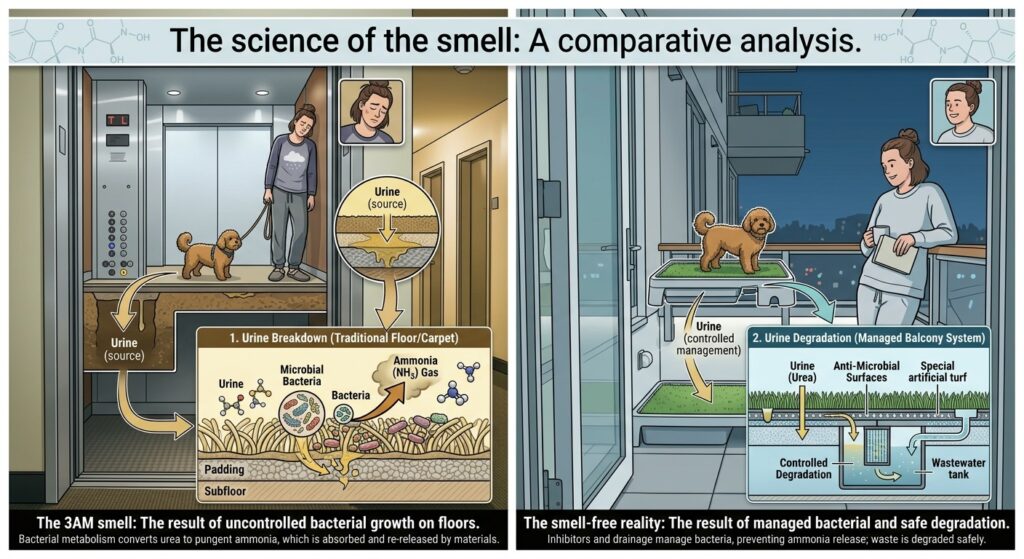
Dog urine contains nitrogen, urea, and uric acid. When it sits on a surface — a mat, a patch of fake grass, a tray with no drainage — bacteria start breaking it down.
That breakdown process releases ammonia.
And ammonia doesn’t just smell terrible. It’s an irritant.

In a small apartment, prolonged exposure can affect your dog’s respiratory system and yours.
It’s also a signal that bacteria are thriving where your dog stands, which is a sanitation problem, not just an aesthetic one.
Here’s the reality check:
The difference between a sanitary potty area and a health hazard isn’t the surface material. It’s what happens underneath that surface.
Without a mechanism to separate liquid waste from the contact surface, you’re not building a potty. You’re building a bacteria sponge.

But wait — this isn’t a “give up and buy a $200 system” post. The fix is simpler than it sounds. And it costs less than a bag of premium dog food.
The Air Gap Principle: The One Idea That Solves Everything

Think about it this way: When a dog pees on grass outside, the urine drains into soil, gets diluted by rain, and breaks down through millions of microorganisms. Nature handles it.
When you confine that same process to a shallow tray in your apartment, there’s nowhere for the urine to go.
It pools. It ferments. It stinks.
The solution is called an air gap — and it’s the single most important design feature of any potty system that actually works.
Here’s what it looks like:

- Top layer: A permeable surface (artificial turf, gravel, or a grate)
- Air gap: A sub-layer — plastic deck tiles, an egg-crate grid, or kennel decking — that elevates the top surface
- Bottom layer: A sloped tray or basin that collects liquid and directs it to a drain
With that air gap in place, three things happen:

- Liquid drains away from the surface immediately
- Air circulates underneath, speeding up drying
- Anaerobic bacteria — the ones that cause ammonia — can’t thrive
Quick pause:
Have you ever noticed how a potty area smells worse on humid days?

That’s because moisture is the enemy. The air gap breaks that cycle.
Now here’s where it gets interesting. The air gap isn’t just about drainage — it’s also about elevation.
By lifting your dog’s contact surface a couple of inches above the collection basin, you stop urine from ever touching the surface they stand on.
That’s the whole trick.
But what surface should sit on top of that gap?
That depends on your dog, your space, and your tolerance for maintenance.
Let’s break it down.
Gravel vs. Mulch vs. Turf: What Actually Works

Before you pick a material, understand this: Some materials fail on day one, and some fail on day three.
The difference is infiltration rate — how fast liquid can pass through.
Here’s the comparison that matters:

| Material | Drainage Speed | Odor Control | Paw Comfort | Maintenance |
|---|---|---|---|---|
| Pea Gravel | High | High (rinses clean) | Medium (can get hot) | Low (rake occasionally) |
| Artificial Turf | Medium/High | Medium (needs enzymes) | High (soft) | Medium (weekly rinse) |
| Wood Mulch | Very Low | Low (absorbs smell) | High | High (replace often) |
| Sand | Medium | Low (holds moisture) | High | High (turn over often) |
The winner for drainage? Pea gravel. It’s inexpensive, allows liquid to pass through instantly, and the smooth, round stones are gentle on paws.

The winner for comfort? Artificial turf. Dogs often prefer the texture, and it mimics grass better than anything else. But it requires diligent enzyme cleaning — we’ll get to that.
We recommend you see our Fake Grass for Dogs guide.” For a complete guide to artificial turf systems.

The loser across the board? Wood mulch. It absorbs urine like a sponge, holds moisture, and decomposes into a sludge you can’t sanitize. Skip it.

Sand looks appealing at first, but it retains moisture and turns into a smelly mess after a few uses. Unless you’re prepared to turn it completely and replace it weekly, skip sand too.
⚠️ The One Material You Must Never Use
Never use cocoa bean mulch in or around a dog potty area.

It smells like chocolate to humans — which is exactly why it’s tempting.
But it contains theobromine, the same toxic compound found in chocolate. Ingestion can cause vomiting, tremors, irregular heartbeat, and in severe cases, it’s fatal.
The ASPCA Toxic and Non-Toxic Plant List confirms theobromine’s toxicity and lists it as a serious risk for dogs. Stick to inorganic materials — stone, synthetic turf, or non-absorbent gravel. No exceptions.
Interactive check-in: Look at your current potty setup.
Is your dog standing on something that holds moisture?
If yes, that’s your ammonia source. The fix starts with what’s underneath, not what’s on top.
The Step-by-Step Build: A Portable Potty with Real Drainage
Ready for the good part?
This build takes about an afternoon and uses materials from any hardware store.
The result is a portable, sloped, drainable potty that you can move, clean, and reuse — without rotting your balcony or your floor.
What You’ll Need

- Pressure-treated 2×6 lumber (cut to your dog’s length)
- Plywood for the base
- Pond liner or heavy-duty shower pan membrane
- A shower drain assembly
- Plastic egg-crate lighting panels or kennel decking
- A catch bucket or drainage tube
- Pea gravel or artificial turf for the top
For a full comparison of DIY vs. store-bought systems, see our Indoor Dog Potty Guide.
Step 1: Build the Frame

Construct a rectangular frame using the 2×6 lumber.
Size matters here.
Your dog needs room to circle before squatting — not just enough space to stand. A good rule: at least 1.5x your dog’s nose-to-tail length, and at least 2 feet wide.
Step 2: Create the Slope

Install a plywood bottom inside the frame. Then use shims to raise one end 1–2 inches higher than the other.
This creates the pitch that makes everything work. Liquid flows downhill — always. Without that slope, the system fails.
Step 3: Waterproof the Basin

Line the entire interior with pond liner or a shower pan membrane. Make sure the liner goes up the sides — this prevents leakage and protects the wood.
Why this step matters: If moisture seeps into the wood, you’ll have rot, mold, and odor within weeks. Waterproofing is non-negotiable.
Step 4: Install the Drain

At the lowest point of the slope, install a shower drain assembly.
Connect it to either:
- A bucket underneath (simplest — empty it every few days)
- A tube directed to a patio drain (better for permanent balcony setups)
This is the step that turns your build from a tray into a real system.
Step 5: Add the Air Gap

Place plastic egg-crate lighting panels or kennel decking over the liner.
This creates the air gap — the layer of elevation that lets liquid drain and air circulate.
This is where the magic happens. Without it, urine pools on top of the liner and the smell returns.
Step 6: Add Your Surface Material

Top the grid with pea gravel or artificial turf.
If you’re using turf, make sure it’s a pet-specific turf with drainage holes in the backing. Standard turf from a hardware store often has a solid backing — which defeats the entire purpose.
And you’re done. Total build time: 2–4 hours. Total cost: less than most store-bought systems.
The Lighter Alternative (For Renters or Small Balconies)

Don’t want to build a wooden frame? Here’s the shortcut.
Modify a large plastic washing machine tray or a shower pan.

- Drill a hole at one end and install a small spout or valve
- Add a slight slope using shims
- Place an egg-crate grid on top
- Add your surface material
The result is a lighter, more portable version of the same system. You can empty it without lifting a full tray — just open the valve and let it drain into a bucket.
This is the version most renters prefer, because it’s removable, doesn’t attach to the deck, and can be moved to a new apartment.
See our Porch Potty Alternatives guide for balcony-friendly potty solutions.
Maintenance That Actually Works

Building the system is half the battle. Maintaining it is the other half.
But here’s the thing — if you’ve designed the drainage right, maintenance becomes simple.
The Daily Routine (2 Minutes)
- Scoop solids immediately
- Rinse the surface briefly with water
That’s it. The drainage system does the rest.
The Weekly Routine (10 Minutes)

- Flush the system with an enzyme cleaner designed for pet waste
- Rinse thoroughly
- Check the collection basin and empty it
Pro tip: Don’t rely on water alone. Water rinses the surface, but it doesn’t break down the uric acid crystals that bind to surfaces and cause lingering odor.
Enzyme cleaners eat those crystals — that’s what makes them different from vinegar or regular cleaners.
If you’re looking for a complete potty training schedule that minimizes accidents, see our Apartment Potty Training Schedule guide.
The enzymatic cleaners are recommended for pet waste because they break down the proteins and uric acid crystals that regular cleaners leave behind.
The Monthly Routine (20 Minutes)

- Remove the surface material (gravel or turf)
- Deep clean the air gap grid
- Rinse the liner and check for wear
- Replace turf if it’s showing wear (gravel only needs occasional topping up)
If you notice ammonia smell returning despite regular cleaning, the collection basin is probably overdue for emptying — or the air gap isn’t working properly. Check the elevation.
Common Problems and How to Fix Them
Problem: The smell comes back within a few days of cleaning.

Fix: Check your air gap. If the egg-crate grid is flat on the liner with no elevation, there’s no drainage. Add shims or additional grid layers.
Problem: My dog won’t use it.

Fix: Start with a familiar surface. Put a piece of turf or a pee pad on top for a few days, then gradually remove it. Also make sure the potty is placed somewhere quiet, not next to food or water bowls.
Explore our Apartment Puppy Loo guide for puppy-specific indoor potty training.
Problem: The gravel keeps getting kicked out.

Fix: Use a slightly higher lip on the frame, or switch to turf. Gravel is great for drainage but not for dogs who love to dig.
Problem: The collection basin smells even when empty.

Fix: Clean it with an enzymatic cleaner, not bleach. Bleach leaves residue that can actually attract dogs back to the spot and can degrade plastic over time.
Why This System Works (When Others Fail)
Most DIY potty builds fail for one of three reasons:
- No drainage — urine sits on the surface and ferments
- No air gap — moisture gets trapped, bacteria thrive
- No waterproofing — the wood rots and becomes a permanent smell source
This system solves all three.
And here’s the part most people miss: It’s portable.
You’re not pouring concrete or building a permanent structure. You can take it with you if you move, adjust the size as your dog grows, and replace only the surface material when needed.
That’s what makes it a real solution — not just a weekend project.
The Bottom Line

A dog potty that doesn’t smell isn’t about buying the right mat or the fanciest turf. It’s about engineering — a slope, a drain, and an air gap that stops urine from ever pooling where your dog stands.
If you’ve been fighting the smell, the fix is underneath your current setup, not on top of it.
Build the system once, maintain it weekly, and you’ll never have to dread that 3 AM walk — or the smell that follows you back inside.
Get details of our Potty Pads for Studio Apartments guide for a complete potty pad system for small spaces.
Your turn: Before you build, test your current setup with the 5-second check. Press the back of your hand against the surface for five seconds. If it feels damp, warm, or smells faintly of ammonia, your drainage is failing. Time to rebuild — and now you know exactly how.
🐾 — Apartment Dog Guide (ADG)
Living large in small spaces, one paw at a time. That’s the apartment dog life—see you in the next guide!.


